Safety and installation instructions
Please carefully read the prescribed safety instructions and stipulations from the vehicle manufacturer and service workshops if applicable.
Leave all the coloured spacers in their current position until the hatch is completely installed!
We strongly suggest to check before starting the installation if this is having an impact on the vehicle registration. This to avoid possible problems with government authorities and / or with your insurance company.
Outbound accepts no liability for damage in the following cases:
- Damage to the product resulting from mechanical influences.
- Alterations to the hatch.
- In case of improper use.
- If the manual has not been followed.
- We advise NOT to spray / paint the vehicle and the products in a dark color. Dark colors absorb heat and affect the vehicle and the installed products. This can lead to damage / distortion of the products and negatively influence the operation of the products.
Warning! Failure to observe this instruction can cause material damage and impair the function of the hatch.
Note: If you do not have sufficient technical knowledge for installing the components in vehicles, you shouldhave a specialist install the window in your vehicle.
Please note the following:
- If faults or disturbances occur, consult a specialist workshop immediately.
- Before starting your journey, check that the hatch is locked properly and free from damage.
- Close the hatch in strong wind, and upon precipitation.
Warning! Always keep the hatch locked while driving.
Instructions before installation
Before installation, check the wall thickness of your vehicle. The Outbound hatch can be used without modification in a 60 to 80 mm thick wall. Below 60 mm we ask you to fill and reinforce the wall with a frame.
When choosing the installation location, observe the following:
- Adjoining components (attachment and reinforcing parts), cables and cabinets in the vehicleinterior must not get damaged when sawing the hole.
- Sufficient space needs to be available for installing the frame.
- Only install the frame on flat surfaces and do not bend the frame.
- Torsion and tension in the box can damage the hatch.
- Check if the product measurements match the drawingmeasurements. Check the positioning of the hatch on the in-and outside of the vehicle.
- Hatches and doors are produced with a single fitting key, unlessordered otherwise.
- Always mount the hatch with the hinge on top.
In the drawing the hatch is mounted into the wall.
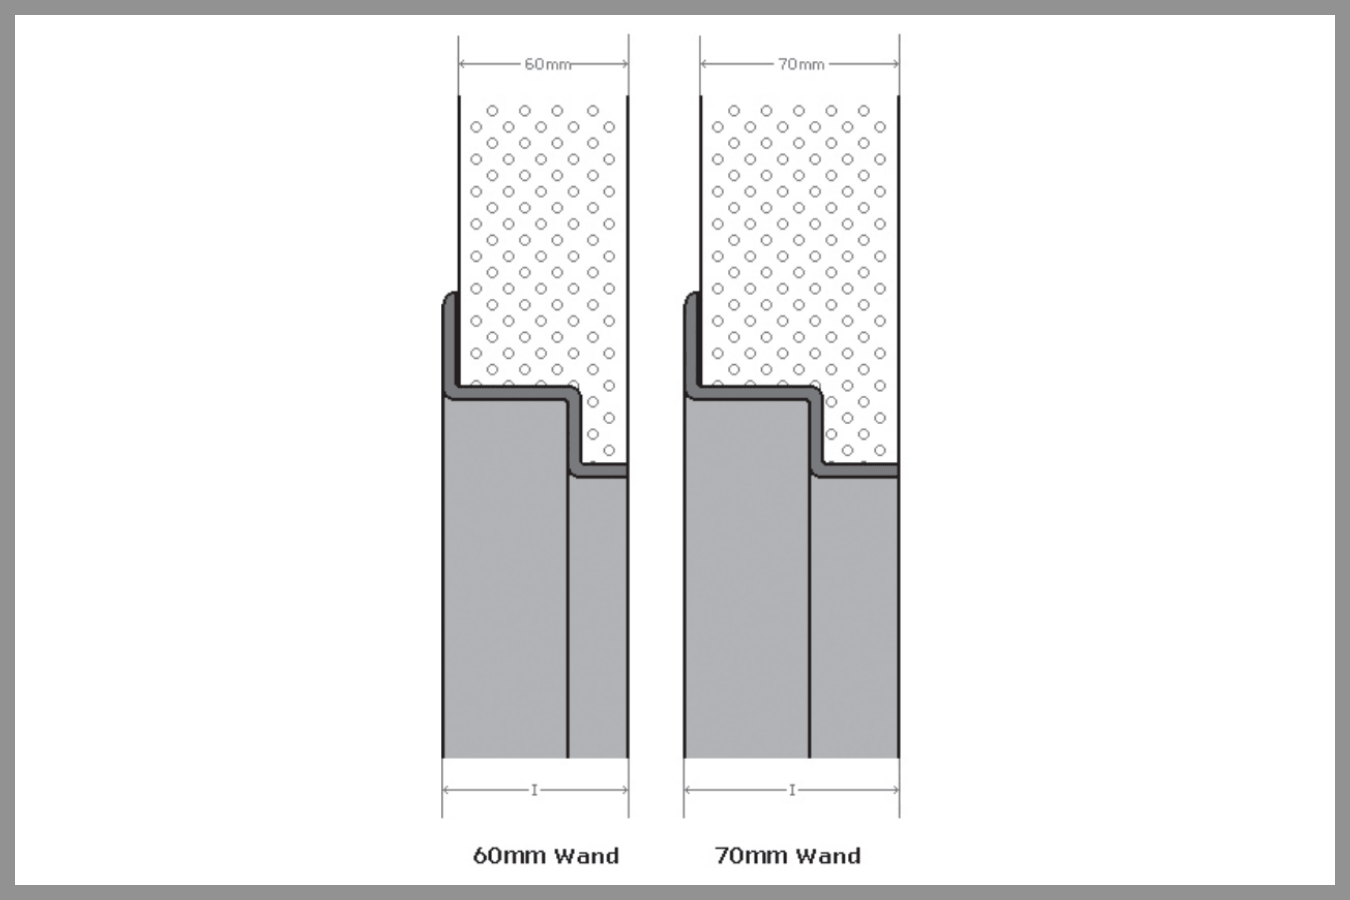
Warning! Do NOT remove the coloured spacers! The purpose of these spacers is to maintain a uniform gaparound the product, for easy installation. We advise to leavethem in place until the installation is completely finished andthe adhesive has set. Premature removal of the colouredspacers can lead to deformation of the frame.
Pressing / cutting out the hole
Make the cut-out according to the drawing below. In the drawing and the diagram with the measurements, a margin has already been taken into account in order to install the products as good as possible. Always place the product tension-free.
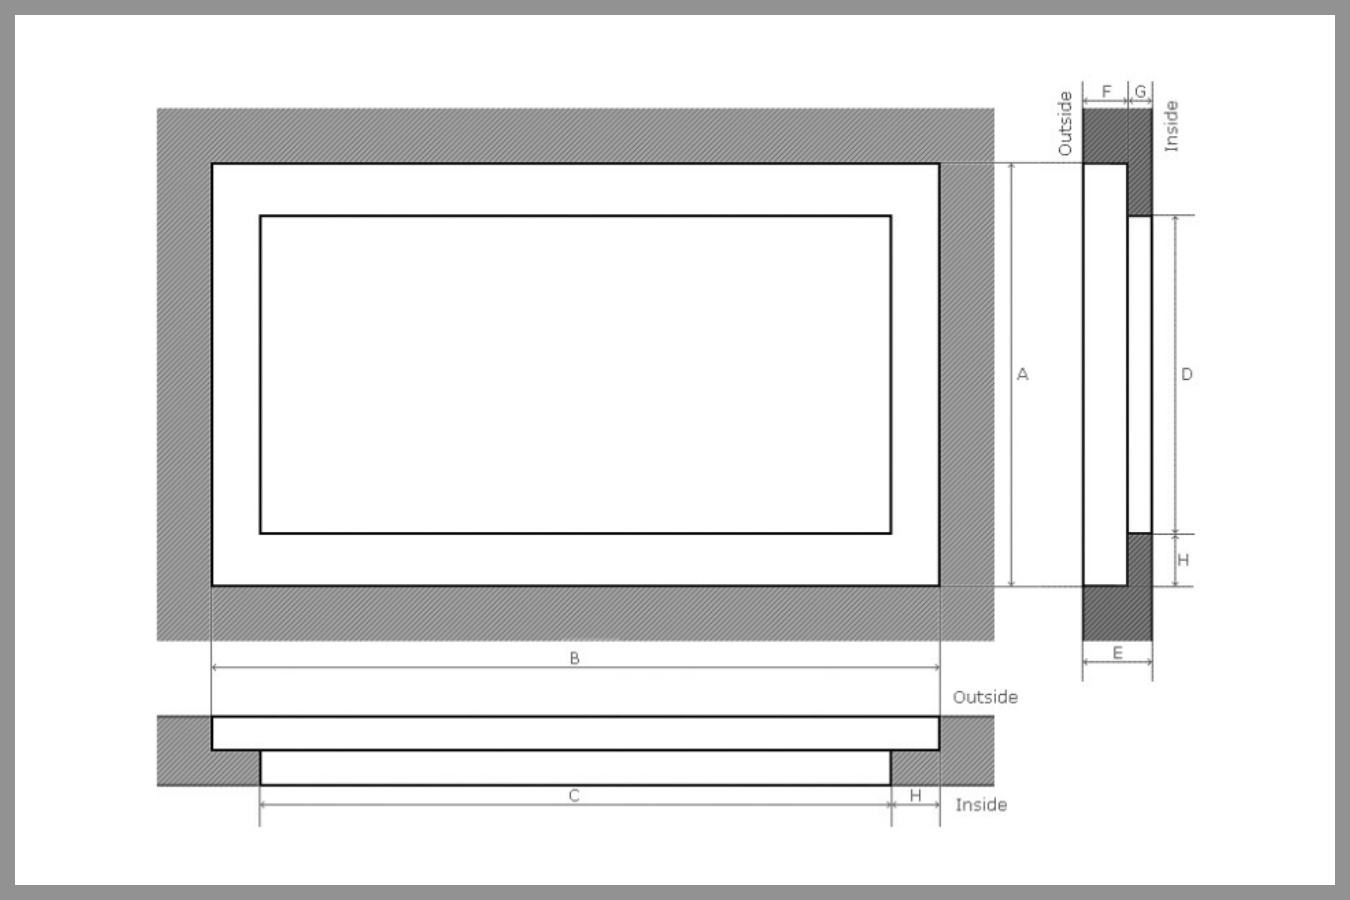
| Product | A | B | C | D | E | F | G | H |
|---|---|---|---|---|---|---|---|---|
| LU-03 | 395 | 525 | 470 | 340 | * | 42 | * | 30 |
| LU-20 | 466 | 714 | 655 | 404 | * | 42 | * | 30 |
| LU-30 | 565 | 666 | 603 | 505 | * | 42 | * | 30 |
| LU-35 | 463 | 1050 | 995 | 405 | * | 42 | * | 30 |
| LU-38 | 667 | 859 | 796 | 605 | * | 42 | * | 30 |
| LU-40 | 666 | 1054 | 990 | 604 | * | 42 | * | 30 |
| LU-42 | 566 | 1254 | 1195 | 505 | * | 42 | * | 30 |
| LU-48 | 1035 | 1230 | 1170 | 978 | * | 42 | * | 30 |
| LU-50 | 620 | 1775 | 1715 | 565 | * | 42 | * | 30 |
| LU-55 | 695 | 1775 | 1715 | 640 | * | 42 | * | 30 |
| LU-60 | 695 | 1940 | 1885 | 640 | * | 42 | * | 30 |
* Depends on wall thickness.
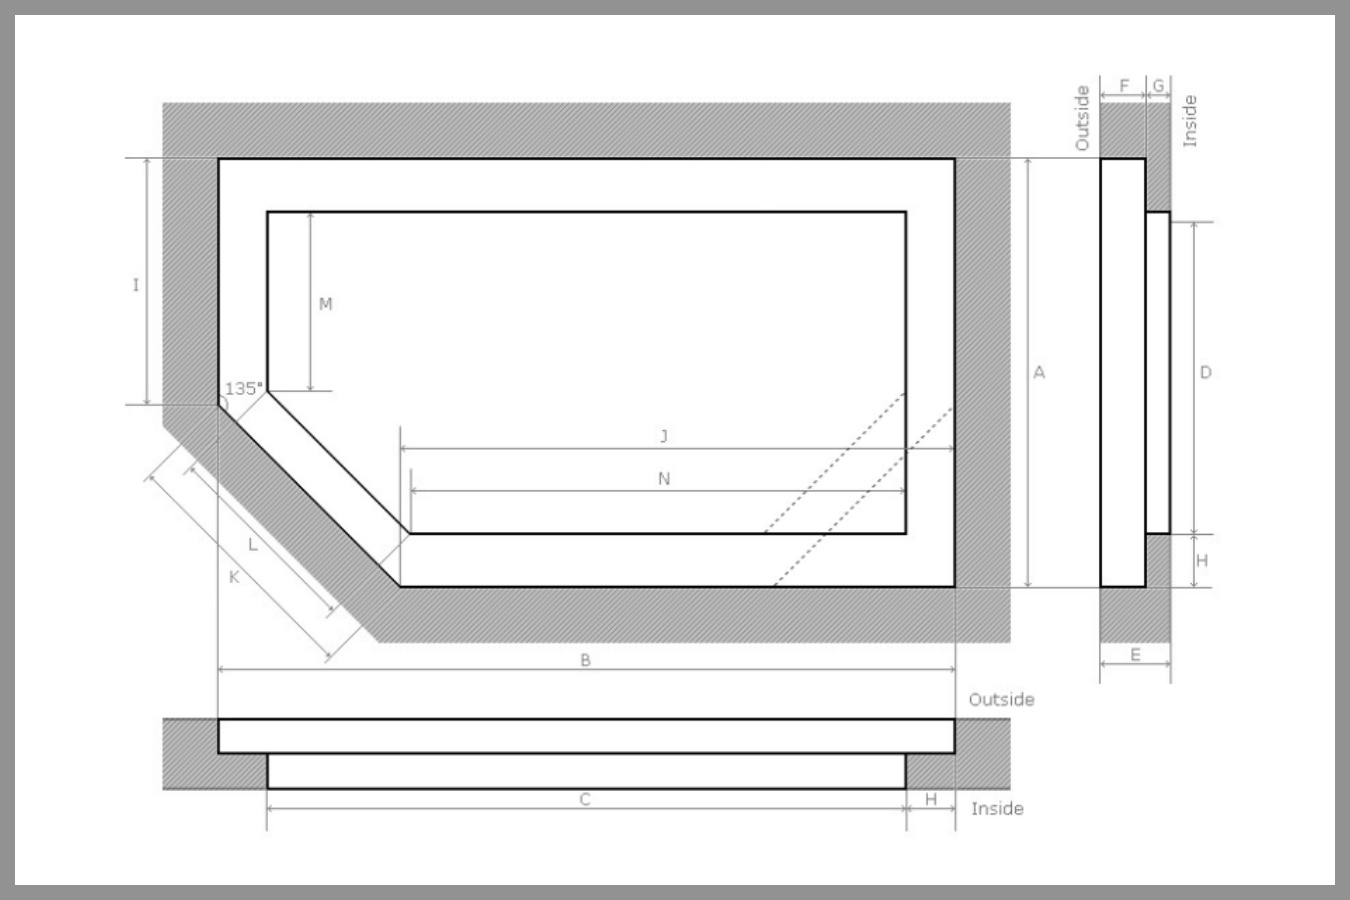
| Product | A | B | C | D | E | F | G | H | I | J | K | L | M | N |
|---|---|---|---|---|---|---|---|---|---|---|---|---|---|---|
| LU-45R | 669 | 1058 | 998 | 609 | * | 42 | * | 30 | 397 | 786 | 386 | 361 | 354 | 743 |
| LU-45L | 669 | 1058 | 998 | 609 | * | 42 | * | 30 | 397 | 786 | 386 | 361 | 354 | 743 |
| LU-47R | 888 | 1112 | 1052 | 828 | * | 42 | * | 30 | 471 | 695 | 591 | 566 | 428 | 652 |
| LU-47L | 888 | 1112 | 1052 | 828 | * | 42 | * | 30 | 471 | 695 | 591 | 566 | 428 | 652 |
* Depends on wall thickness.
Installing the Outbound hatch
Preparation of the installation surface and product:
- Sand the to be glued surface with sandpaper, clean and degrease the surface you want to glue.
- Then apply activator (or equivalent) according to the instruction of the glue-manufacturer.
- Primer can be necessary according to the instructions of the glue-manufacturer.
Installation of the hatch:
- Apply adhesive to the framework.
- Place the framework in the opening and apply pressure to the frame.
- Unlock the handle so there is no tension on the frame, do not open the hatch and leave the coloured spacers in their position.
- Make sure the frame is completely straight, not bent or twisted in any direction, specifically at the position of the lock.
- Visually check that all the adhesive comes out completely from under the frame and that the outer frame is fully in contact with the wall surface, without any gaps left.
- Remove excessive adhsive immediately after the installation.
- Do not open the product and do not use clamps to clamp the frame in the wall panel. Tape is a good alternative.
- Allow the adhesive to set for 24 hours.
- Once the adhesive has set and has sufficient strength, check if the wall panel is still flat and even. A not flat or not straight wall panel will influence the functioning and closing of the Outbound hatch and can result in a product that is not waterproof.
- Check the frame on positioning and closing of the hatch and lock. Make sure the coloured spacers areback in position afterwards.
- Close the hatch and make sure the wall and hatch are completely straight and flat, this is especially important near the lock. If needed use the spacers to make sure everything is straight.
- Finish the inside seam with adhsive (or equivalent).
- After 24 hours the coloured spacers can be removed, the gas springs can be mounted and the product can be used.
Making a final check:
- After installing, check if the hatch works properly.
- If necessary, enter the new vehicle weight in the vehicle documents.
Using the Outbound hatch
Opening and closing the Outbound hatch:
Twist the handle to unlock and open the hatch.
Closing the hatch:
The hatch is completely closed when you twist the handle and locked if you hear a click. Close and lock the hatch with the key.
Troubleshooting
If you are unable to install the products properly, get in touch with a specialist, workshop or contact Outbound at www.outbound.eu.
Servicing the Outbound hatch
- Clean the hatch with mild soap and water.
- Put talcum powder on the rubber seal of the hatch, this extends the life of the rubber.
- To clean and maintain the life of the gas spring, only clean it with a dry cloth. Chemicals and other cleaning products can damage the gas spring, causing it to lose its effect completely.
- Lubricate the lock regularly with a suitable lubricant.
Warranty
If the hatch is defective, please contact your point of sales in your country or send an e-mail to info@outbound.eu.
You can also view our general terms and conditions on our website.
Address: Zandhoek 7a, 5427 PJ, Boekel, The Netherlands
Telephone: +31 (0)492 76 00 34
Email: info@outbound.eu