Yes. Outbound windows are designed for self-installation in expedition vehicles and campers. However, if you do not have sufficient technical knowledge or experience, we recommend having the product installed by a qualified professional.
Safety and Installation Instructions
Please carefully read the prescribed safety instructions and stipulations from the vehicle manufacturerand service workshops.
Leave all the coloured filler plates and foam in their current position until the window is completelyinstalled!
Before starting the installation we strongly suggest to check if this is having an impact on the vehicleregistration. This to avoid possible problems with government authorities and/ or with your insurance company.
Outbound accepts no liability for damage in the following cases:
- Damage to the product resulting from mechanical influences.
- Alterations to the window and roller blinds.
Warning! Failure to observe this instruction can cause material damage and impair the function of the windowor roller blind.
Note: If you do not have sufficient technical knowledge for installing the components in vehicles, you shouldhave a specialist install the window in your vehicle.
Please not ethe following:
- If faults or disturbances occur, consult a specialist workshop immediately.
- Before starting your journey, check that the windows are locked properly and freefrom damage.
- Close the window in strong wind, and upon precipitation.
Warning! Always keep the window closed while driving.
Instructions before installation
Before installation, check the wall thickness of your vehicle. Outbound windows can be used withoutmodification in a 55 to 70 mm thick wall with roller blind and 60 to 85 mm without roller blind.
Below 55 mm with Rollo we ask you to fill and reinforce the wall with a frame, without Rollo 60 mm.
When choosing the installation location, observe the following:
- Adjoining components (attachment and reinforcing parts), cables and cabinets in the vehicle interior must not get damaged when sawing the hole.
- Sufficient space needs to be available for installing the inner and outer frames.
- Only install the frame on flat surfaces and do not bend the frame.
- Torsion and tension in the box and panels can damage the windows.
- Check if the product measurements match the drawing measurements.
- Check the positioning of the window on the in- and outside of the vehicle.
- Always mount the windows with the hinge on top.
WARNING! Do NOT remove the coloured and cardboard spacers! The purpose of these spacers is to maintain a uniform gap around the product, for easy installation. We advise to leave them in place until the installation is completely finished and the adhesive has set. Premature removal of the coloured and cardboard spacers can lead to deformation of the frame.
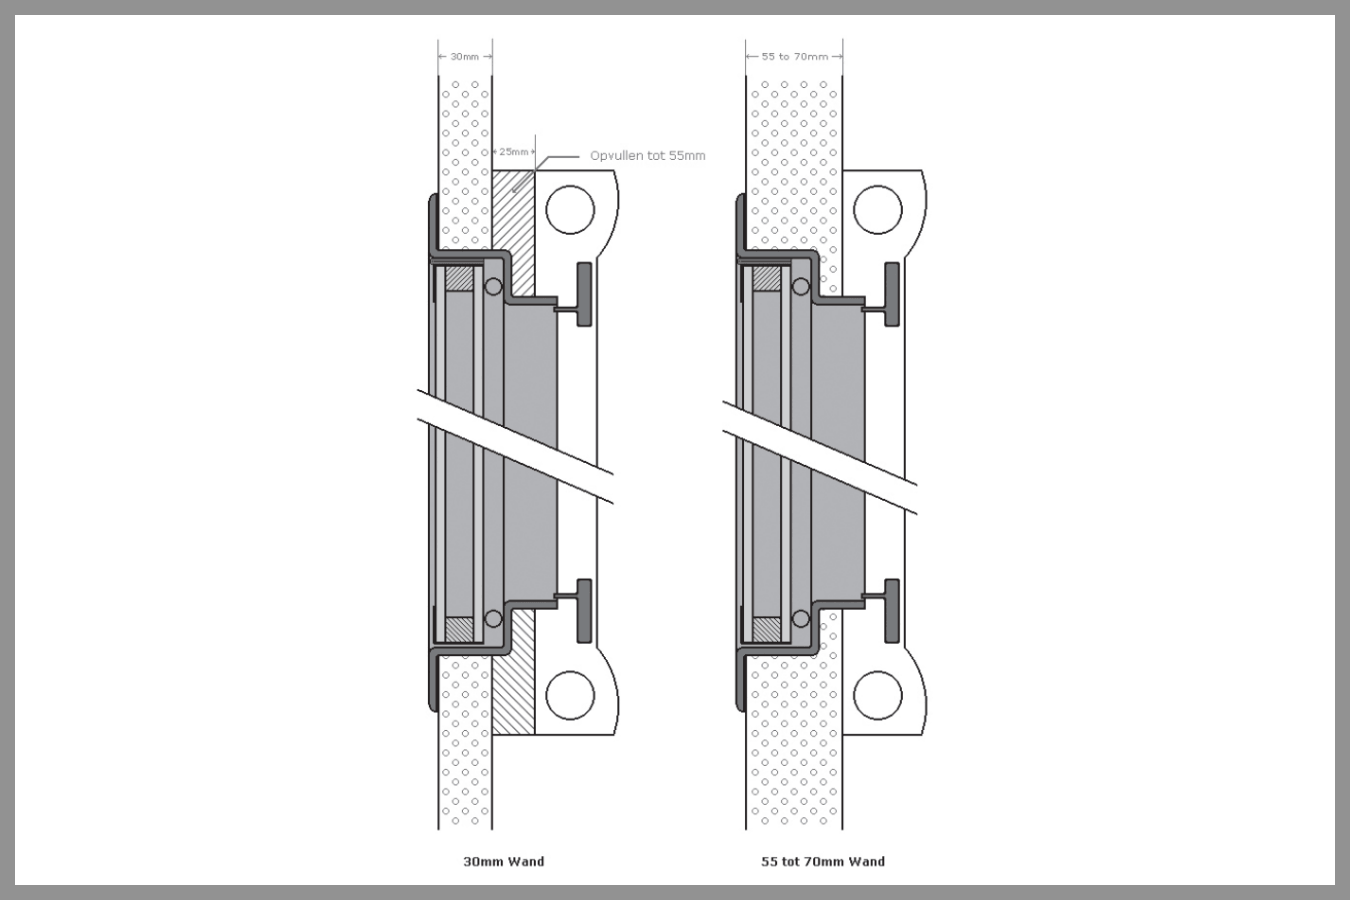
Pressing / cutting out the hole
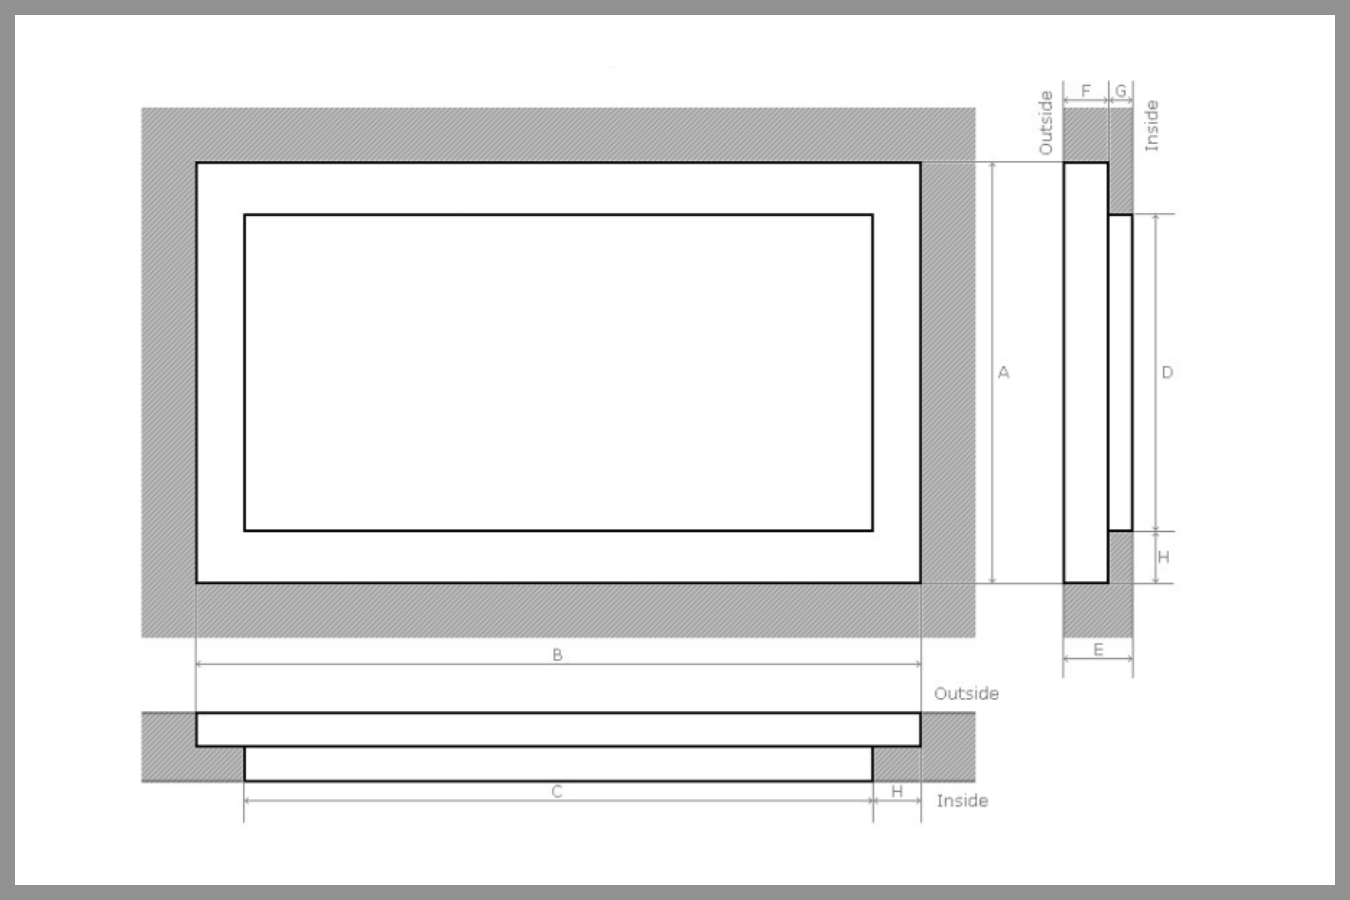
Make the cut-out according to the drawing below. In the drawing and the diagram with the measurements, a margin has already been taken into account in order to install the products. Always place the product tension-free.
Opening Dimensions
| Product | A | B | C | D | E | F | G | H |
|---|---|---|---|---|---|---|---|---|
| RA-03 | 395 | 525 | 465 | 335 | X | 40 | X | 30 |
| RA-03V | 525 | 395 | 335 | 465 | X | 40 | X | 30 |
| RA-05 | 326 | 729 | 669 | 266 | X | 40 | X | 30 |
| RA-05V | 729 | 326 | 266 | 669 | X | 40 | X | 30 |
| RA-10 | 406 | 729 | 669 | 346 | X | 40 | X | 30 |
| RA-20 | 470 | 719 | 659 | 410 | X | 40 | X | 30 |
| RA-30 | 570 | 673 | 613 | 510 | X | 40 | X | 30 |
| RA-35 | 465 | 1055 | 995 | 405 | X | 40 | X | 30 |
| RA-40 | 670 | 1063 | 1003 | 610 | X | 40 | X | 30 |
| RA-42 | 565 | 1255 | 1195 | 505 | X | 40 | X | 30 |
| RA-50 | 621 | 1775 | 1715 | 561 | X | 40 | X | 30 |
Installing the Outbound window
Preparation of the installation surface and product
- Sand the to be glued surface with sandpaper, clean and degrease the surface you want to glue.
- Then apply activator (or equivalent) according to the instruction of the glue-manufacturer.
- Primer can be necessary according to the instructions of the glue-manufacturer.
Installation of the window
- Apply adhesive to the framework.
- Place the framework in the opening and apply pressure to the frame.
- Unlock the handle so there is no tension on the frame, do not open the window and leave thecoloured and cardboard spacers in their position.
- Make sure the frame is completely straight, not bent or twisted in any direction, specifically at theposition of the lock.
- Visually check that all adhesive comes out completely from under the frame and that the outerframe is in full contact with the wall surface, with no gaps left.
- Remove excessive adhesive immediately after the installation.
- Do not open the product and do not use clamps to clamp the frame in the wall panel. Tapeis a good alternative.
- Allow the adhesive to set for 24 hours.
- Once the adhesive has set and has sufficient strength, check if the wall panel is still flat and even. Anot flat or not straight wall panel will influence the functioning and closing of the Outbound windowand can result in a product that is not waterproof.
- Check the window frame on positioning and closing of the window, ventilation position and lock.Make sure the coloured and cardboard spacers are back in position afterwards.
- Close the window and make sure the wall and window are completely straight and flat, this isespecially important near the lock, if needed use spacers to make sure everything is straight.
- Finish the inside seam with adhesive.
- After 24 hours the coloured and cardboard spacers can be removed and -if applicable- gas springsand blinds can be mounted.
Making a final check
After installing, check if the window works properly.
If necessary, enter the new vehicle width & weight in the vehicle documents.
Installation of the roller blind
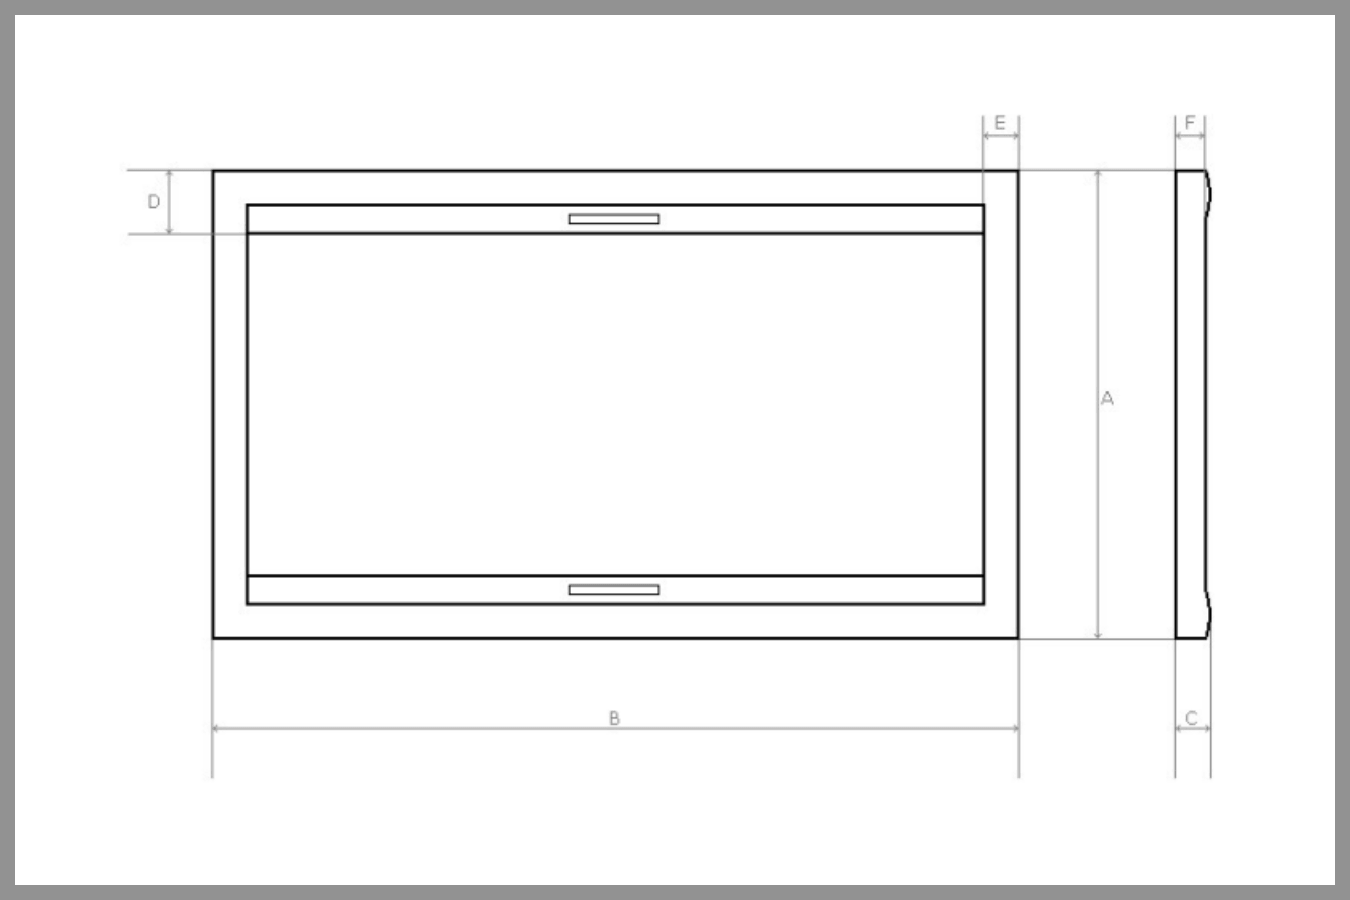
- Check if the product measurements match the drawing measurements.
- Remove the two front covers.
- Unscrew the little screw at the green tension wheel.
- Take the top roller out of the cassette.
- Put the roller blind in place over the window frame and check the positioning.
- Screw the framework to the wall on the top with 2 screws.
- Rewind the top roller and place it back.
- Take the bottom roller out of the cassette after unscrewing the little screw at the green tension spring.
- Screw the framework to the wall on the bottom with 2 screws.
- Rewind the bottom roller and place it back.
- Do not forget to replace the small screw at the green tension wheel.
- Place back the two front covers.
- Check if the spring has sufficient tension.
Warning! There is tension on the green spring. Hold the spring tight. It can be painful for your fingers if it comes loose unexpectedly.
| Product | Weight | A | B | C | D | E | F |
|---|---|---|---|---|---|---|---|
| CH-03 | 3,2 kg | 488 | 506 | 48 | 95 | 47 | 37 |
| CH-05 | 3,4 kg | 408 | 708 | 48 | 95 | 47 | 37 |
| CH-10 | 3,5 kg | 488 | 704 | 48 | 95 | 47 | 37 |
| CH-20 | 3,7 kg | 552 | 694 | 48 | 95 | 47 | 37 |
| CH-30 | 3,4 kg | 652 | 648 | 48 | 95 | 47 | 37 |
| CH-35 | 5,1 kg | 552 | 1038 | 48 | 95 | 47 | 37 |
| CH-40 | 5,3 kg | 752 | 1038 | 48 | 95 | 47 | 37 |
| CH-42 | 5,7 kg | 652 | 1235 | 48 | 95 | 47 | 37 |
| CH-50 | 7,4 kg | 703 | 1745 | 48 | 95 | 47 | 37 |
Troubleshooting
If you are unable to install the products properly, get in touch with a specialist, workshop or contact Outbound at www.outbound.eu.
Servicing the Outbound window and Roller blind
- Clean the roller blind with mild soap and water.
- The top and bottom cabinets of the blind are easy to clean, due to the click system.
- Pull the covers towards you and click them back in the same way and position.
- We recommend lubricating the side rails with the brushes with a silicone spray.
- You can adjust the tension of the roller blind by turning the green wheel behind the cabinets at thetop and bottom of the roller blind.
- Put talcum powder on the rubber seal, this extends the life of the rubber.
- To clean and maintain the life of the gas spring, only clean it with a dry cloth. Chemicals and othercleaning products can damage the gas spring, causing it to lose its effect completely.
Warning! Never drive with unsecured cover plates. Always secure with therod and red straps.
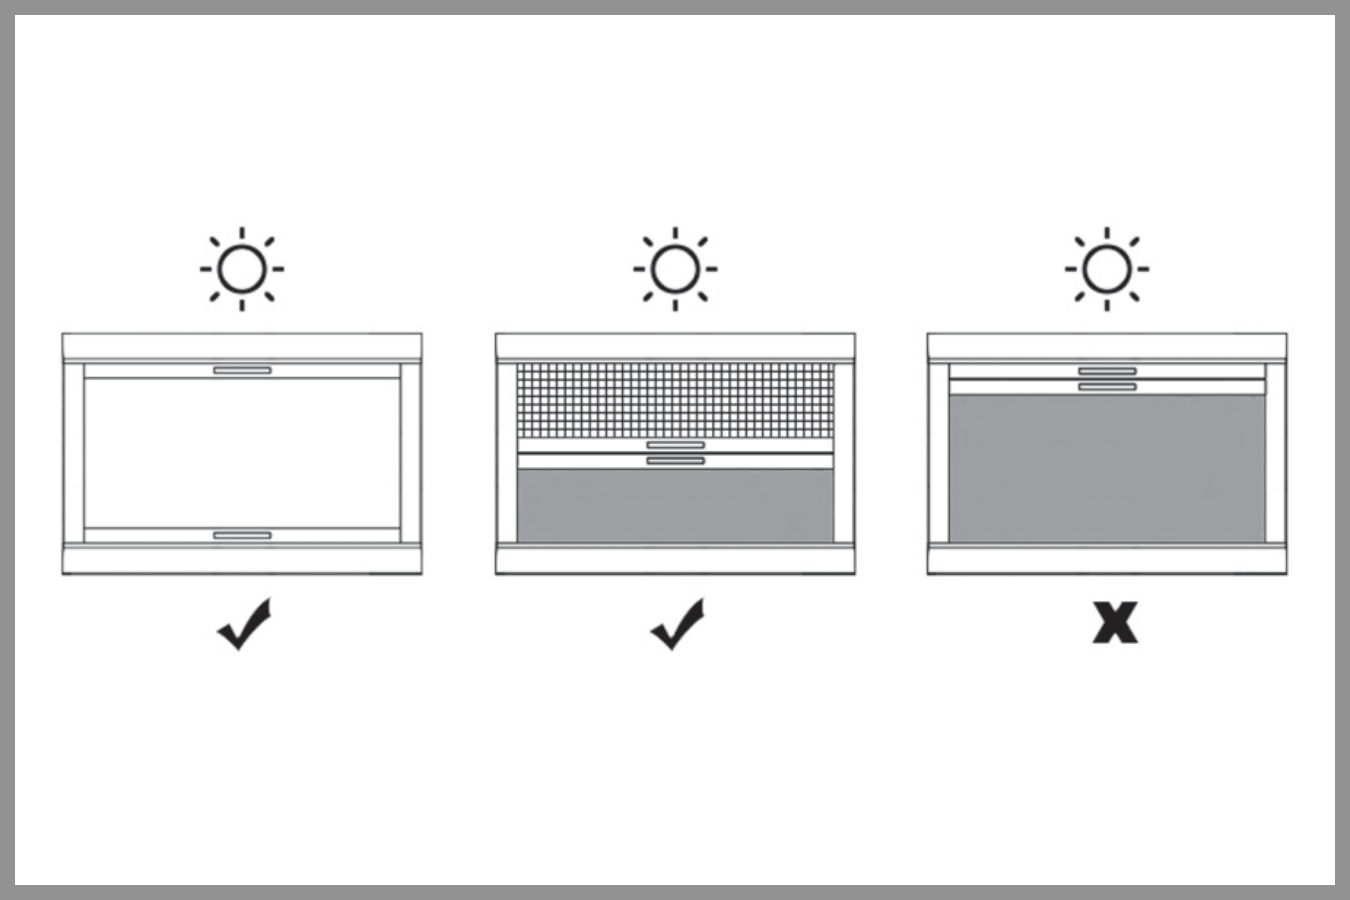
Warning! Heat build-up between the glass and blind can cause damage. Don’t close the window fully in strongsunlight and open the blind at least halfway. When parking the vehicle for longer periods open theblind and flyscreen completely. When driving close the window.
Warranty
If the window / roller blind is defective, please contact your point of sales in your country or send an e-mailto info@outbound.eu. You can also view our general terms and conditions on our website.
Address: Zandhoek 7a, 5427 PJ, Boekel, The Netherlands
Telephone: +31 (0)492 76 00 34
Email: info@outbound.eu
Frequently asked questions
Inspect the window and/or roller shutter carefully before installation. If you notice visible damage or a quality issue, do not install the product. Contact Outbound or your point of sale as soon as possible so we can help resolve the issue.
No. Leave all coloured and cardboard spacers in place until the window has been fully installed and the adhesive has cured. These spacers ensure a consistent installation gap and help prevent frame deformation during installation.