Regular car paint. Lightly sand the gelcoat first. A primer is recommended, but not required.
Before you start
All Outbound frames can be sprayed in the colour of your vehicle. Read this page before you start, so the paint does not crack and the seals stay watertight.
- The frames are supplied in white. This white layer is gelcoat.
- You can spray them with regular car paint. Lightly sand the gelcoat first. A primer is recommended, but not required.
- The self-adhesive rubber seals are supplied loose, so you can spray first and apply the seals afterwards. Only on skylights (DR) the seals are already fitted.
- The gas springs are supplied loose as well. Mount them only after spraying and reassembly. Are they already mounted? Remove them before you start.
- Do not over tighten the screws when reassembling, as this may damage the GRP frame. Use the tightening torques shown in the images.
Warning! Do NOT spray the products in a dark colour. Dark colours absorb much more heat from the sun. The frame, hatch or door can then deform, causing leaks and problems with opening and closing. Outbound accepts no liability for damage caused by spraying the vehicle or products in a dark colour.
Warning! Never paint over a sealant seam. Sealant is flexible, paint is not: the paint on the seam will crack.
Note: If you do not have sufficient technical knowledge, have a specialist spray and reassemble the product.
Choose your method
A. Spray the frame before installation
Spray the frame separately, let the paint cure completely and then install it according to the installation manual of your product. The sealant seam on the outside is applied over the paint and stays flexible.
Important! Put back all shims (spacer plates) in their original position after spraying and before installation. Without the shims, the hatch, door or window will not close properly and may leak.
B. Spray the wall and the frame together after installation
This is possible, but the paint then also covers the flexible sealant seam between the frame and the wall. The wall, the frame and the adhesive each expand and shrink differently. The sealant follows this movement, the paint does not and will crack.
Warning! Did you spray with the frame already installed? Apply a new flexible sealant seam over the existing seam after spraying.
Tip: We advise a flexible MS polymer sealant, such as the one in our webshop.
Windows (RA)
Remove the glass pane including the hinge from the frame. The hinge stays attached to the window.
What to spray:
- Up to under the rubber seal (most common). Spray the outside of the frame up to the area that will be covered by the rubber seal. The rubber seal is then applied over the paint edge, which gives a neat finish. The inside stays white, just like a white roller blind.
- The complete frame. You can also spray the whole frame, inside and outside, in the colour of your vehicle.
Removing the window:
- Open the window. If the gas spring(s) are already mounted, remove them first.
- Unscrew all screws of the hinge on the frame side. The number of screws depends on the size of the product.
- Lift the glass pane including the hinge out of the frame. Put it down safely, never with the glass on a hard surface.
Spraying:
- Lightly sand the frame, clean and degrease it.
- Apply primer if desired and spray the frame.
- Let the paint cure completely before reassembly.
Refitting the window:
- Apply a thin layer of butyl sealant between the hinge and the frame, and also in the screw holes. This keeps the holes sealed and allows the glass pane to be removed again later. Butyl sealant is a seal, not an adhesive.
- Place the glass pane with the hinge back in the frame.
- Tighten the screws to 1.8 Nm (see the image below).
- Mount the gas spring(s) and check that the window opens and closes properly.
Hatches (LU), doors (DE) and cabin doors (CD)
Warning! The hinge always stays on the hatch or door. The hinge is bonded to the hatch or door for a strong attachment. Never remove it. Only unscrew the hinge on the frame side and tape it off before spraying.
What to spray:
- When the frame is sprayed, the hatch or door is always sprayed as well.
- Usually only the outside is sprayed, up to under the rubber seal. The rubber seal covers the paint edge, which gives a neat finish.
- If desired, the inside can be sprayed as well.
Removing the hatch or door:
- Open the hatch or door. If the gas spring(s) are already mounted, remove them first.
- Unscrew all screws of the hinge on the frame side. The number of screws depends on the size of the product.
- Remove the hatch or door and put it down safely.
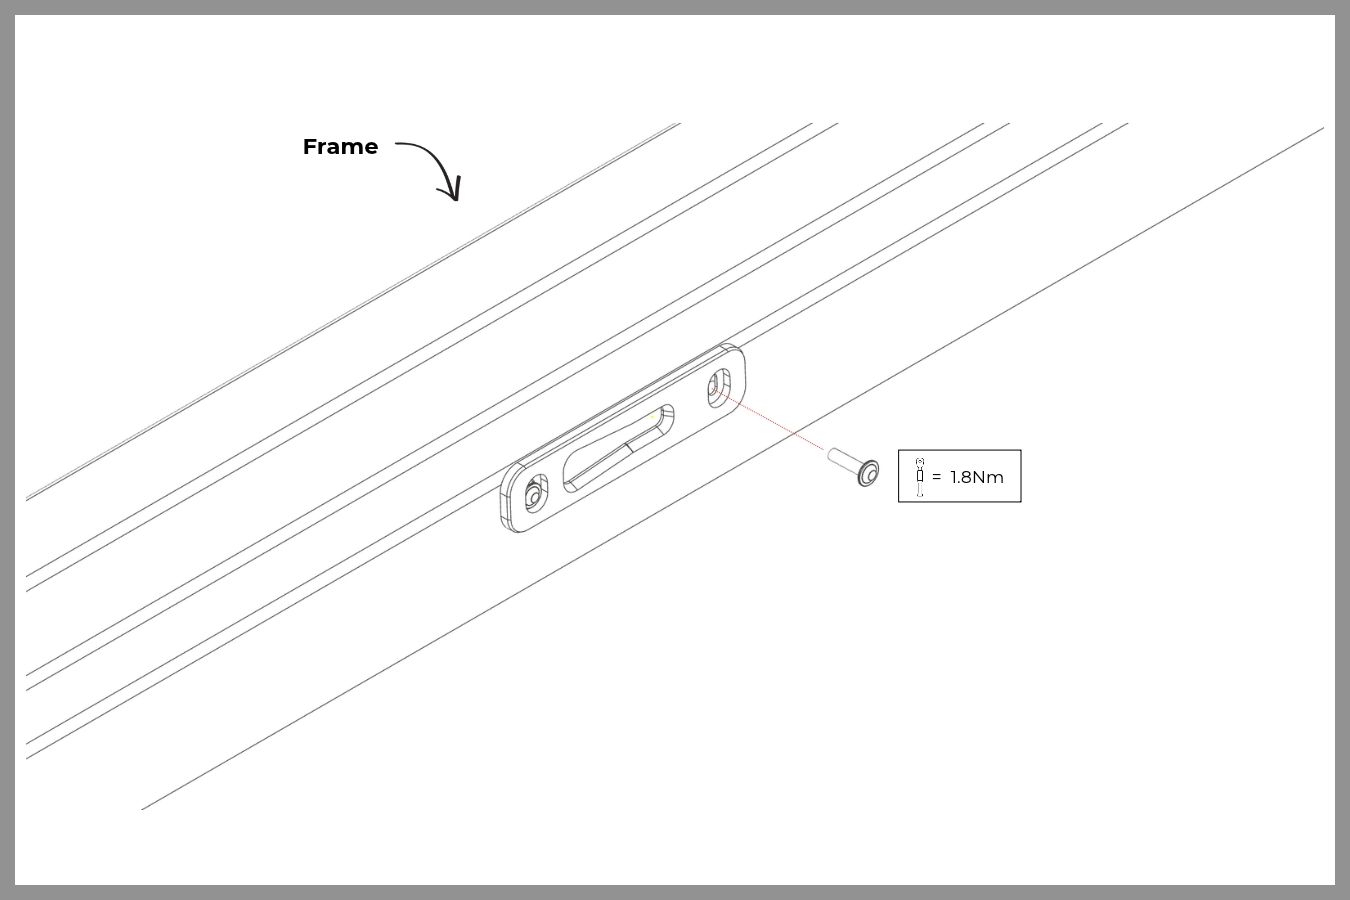
- Remove the locking plates from the frame. Mark or photograph their position first, so you can refit them in exactly the same place.
- Remove the handle (lock housing). It is fixed with screws on the inside of the product: 4 screws on doors, 6 screws on hatches and cabin doors.
Spraying:
- Tape off the hinge on the hatch or door.
- Lightly sand the frame and the hatch or door. Clean and degrease.
- Apply primer if desired and spray.
- Let the paint cure completely before reassembly.
Refitting the hatch or door:
- Refit the handle with the 4 or 6 screws on the inside, as shown in the images below.
- Apply a thin layer of butyl sealant between the hinge and the frame, and also in the screw holes, just like with windows.
- Place the hatch or door back and tighten the hinge screws to 1.8 Nm (see the images below).
- Mount the gas spring(s), if applicable.
- Refit the locking plates in the same position as before. Then check that the hatch or door closes and locks properly, and readjust the locking plates if necessary.
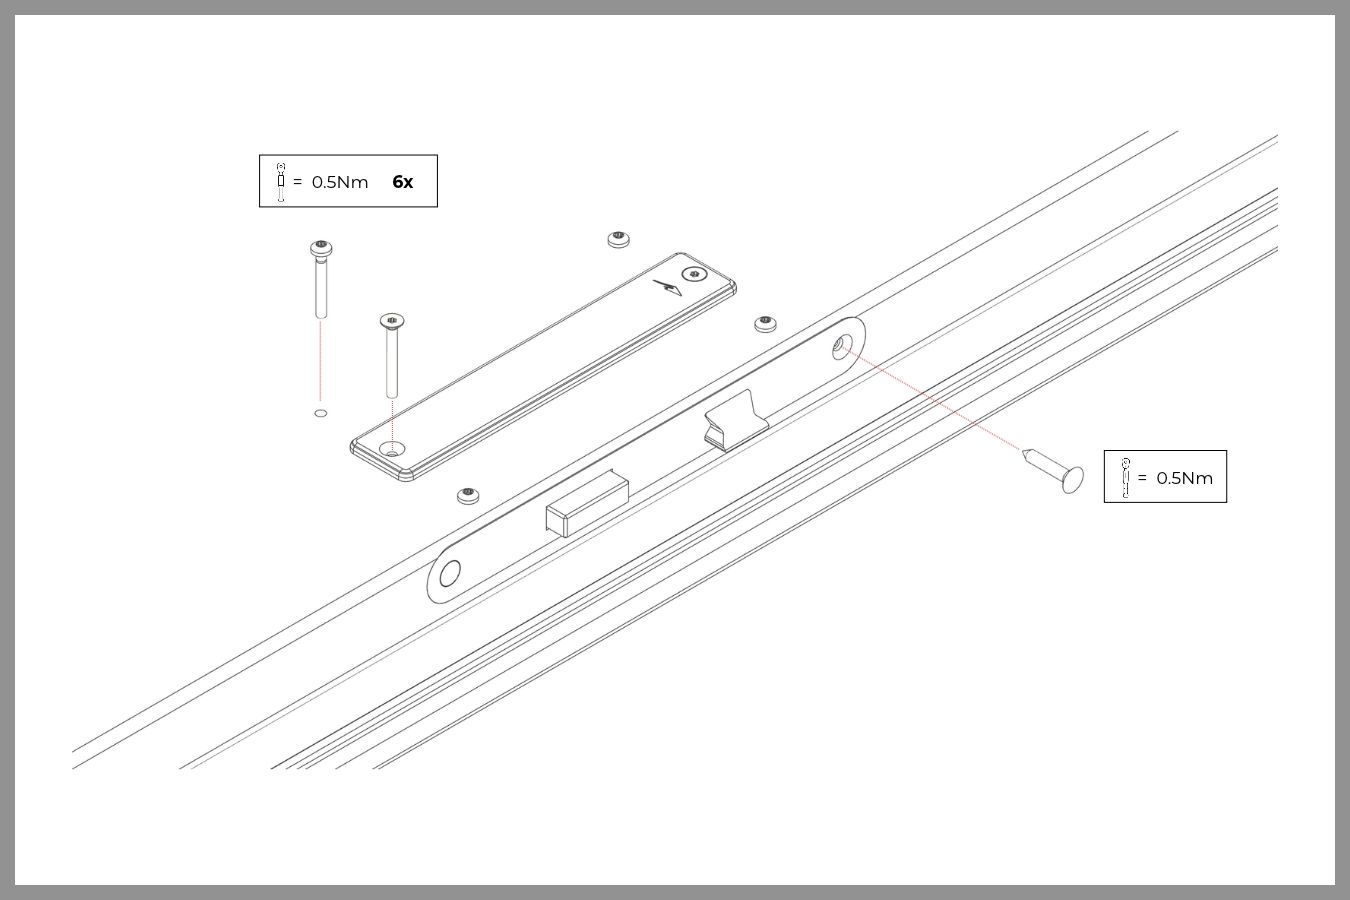
Mount the hatch handle
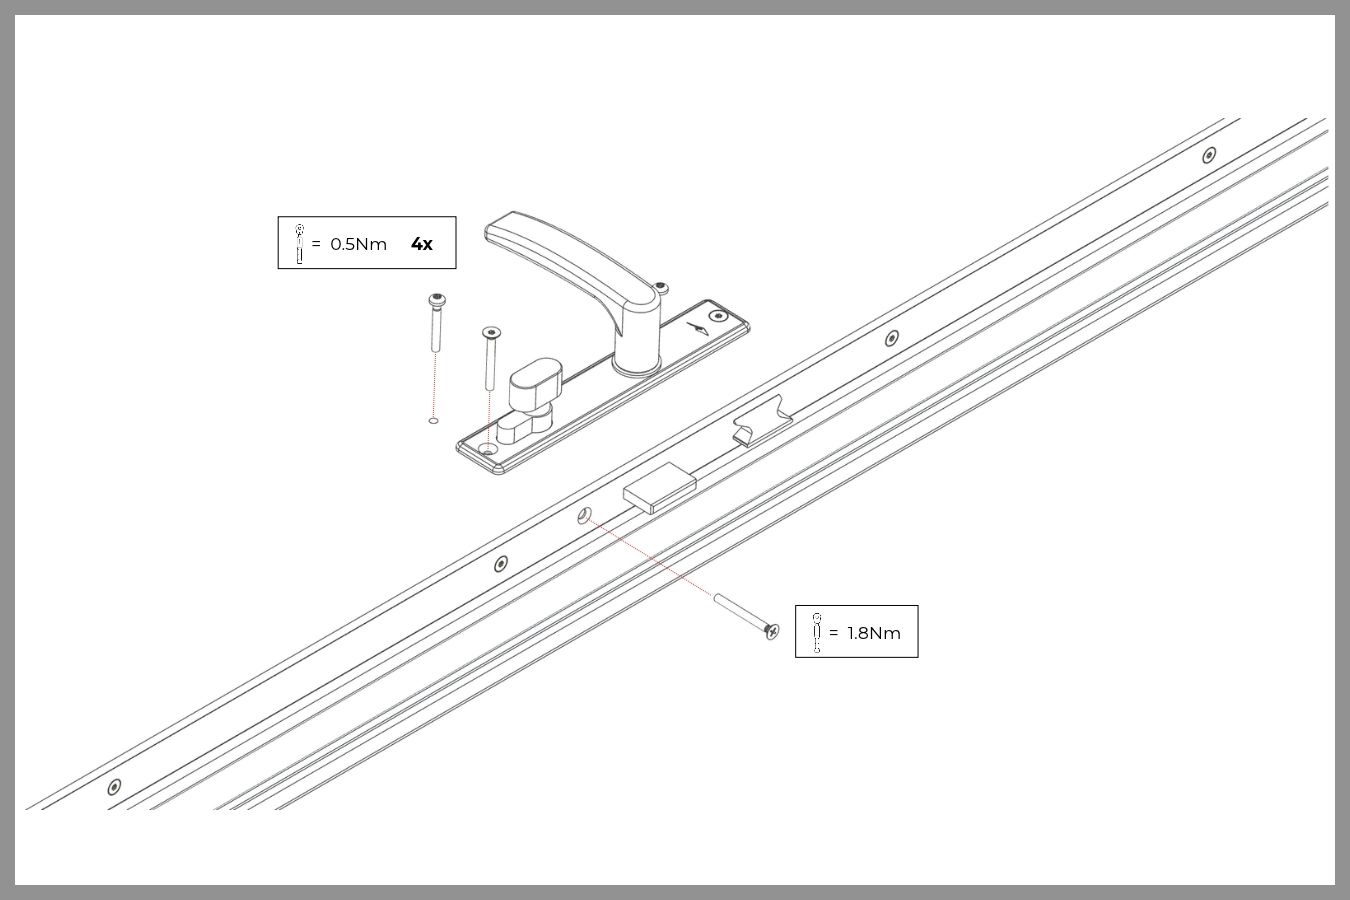
Mount the door handle
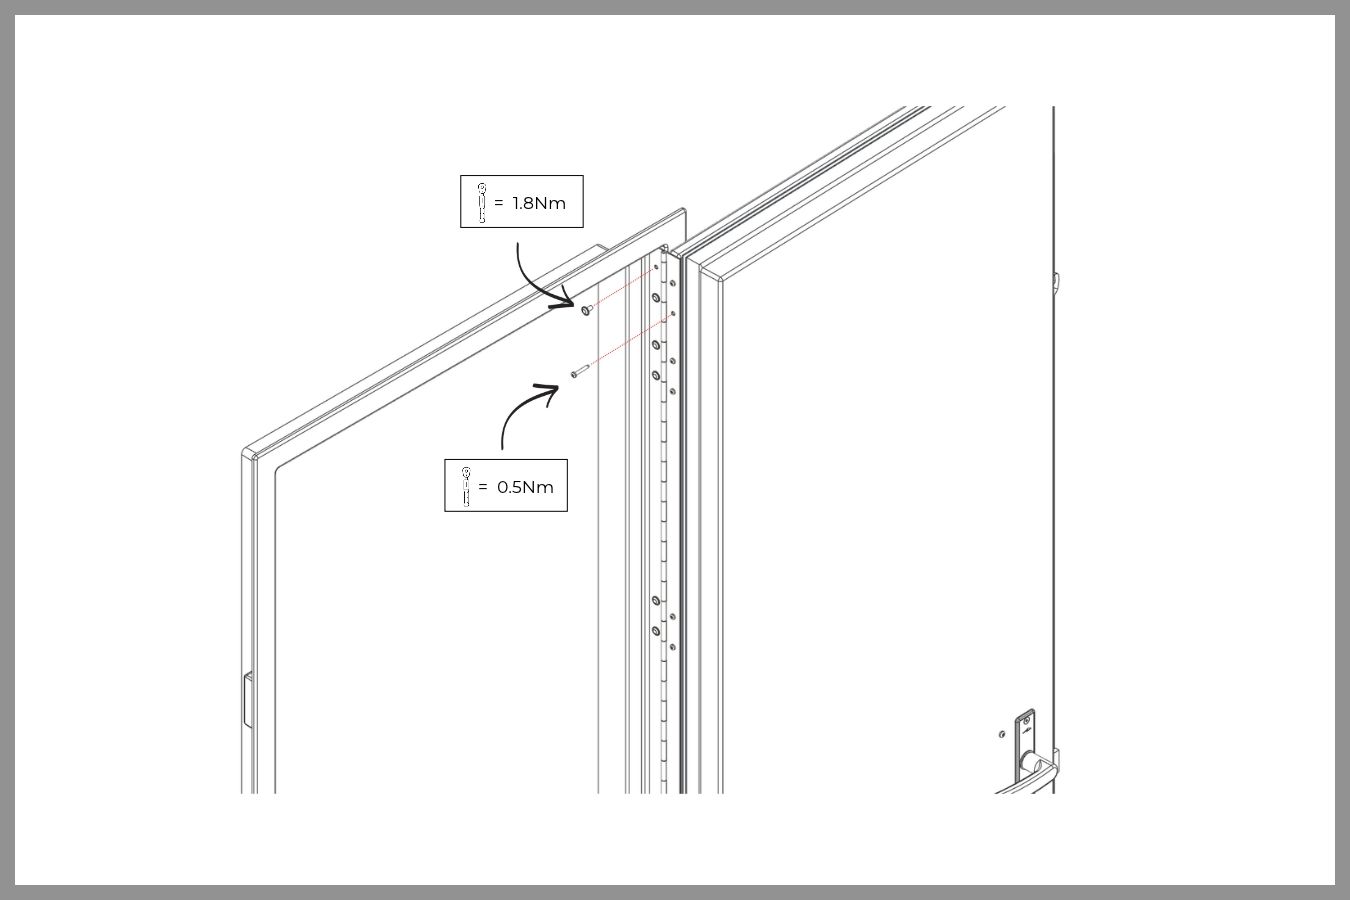
Hinge tightening torque
Skylights (DR)
The frame of a skylight is almost never sprayed. That is why the rubber seals on skylights are fitted as standard.
The cover around the glass can be sprayed. There are two ways to do this:
- Tape off the window: carefully tape off the glass and the rubber seals and spray the cover in place.
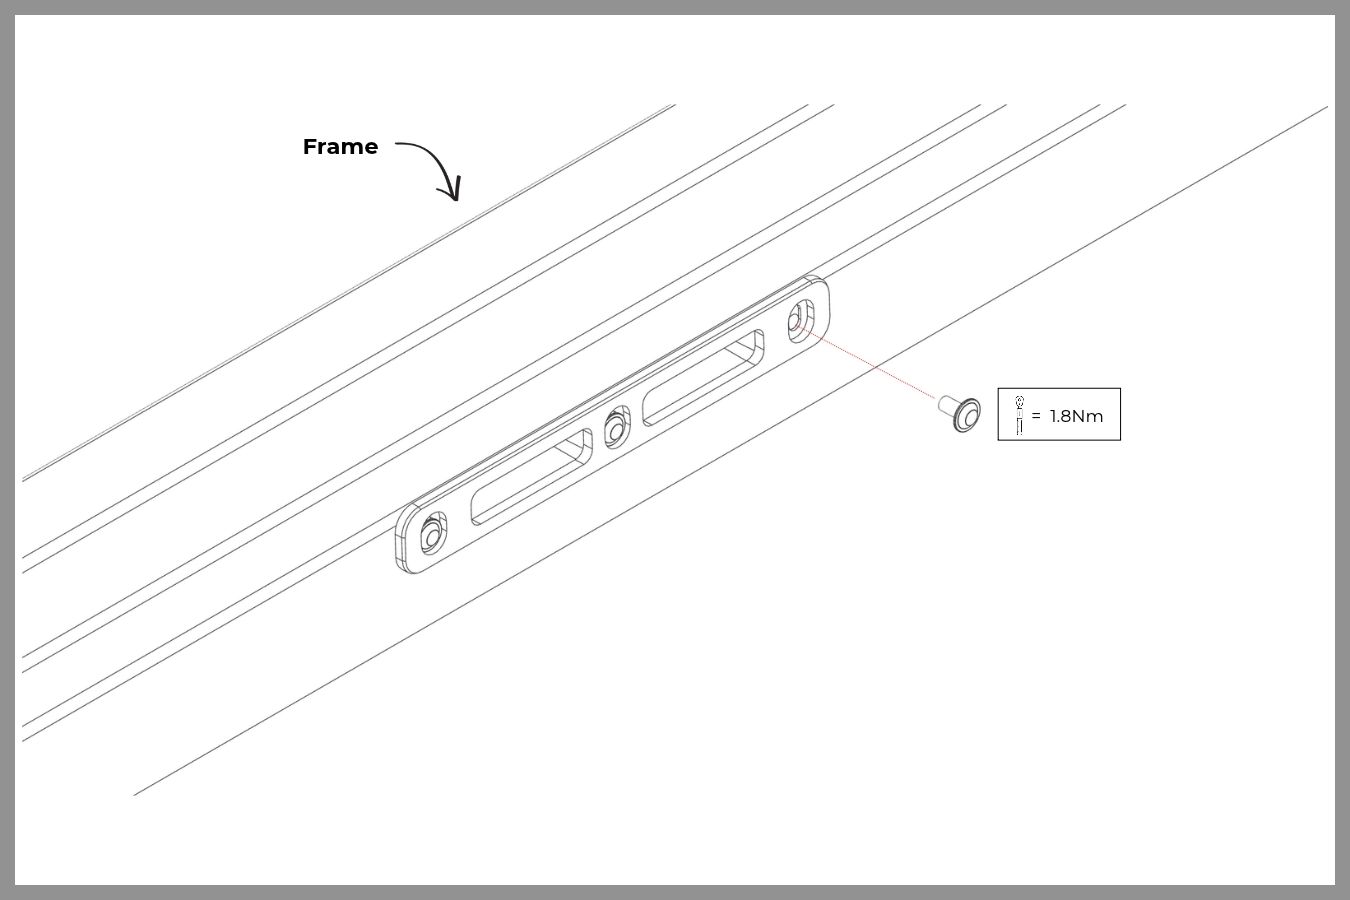
- Remove the cover and glass pane: unscrew the screws to remove the cover and glass pane from the frame. Spray the cover separately, let the paint cure completely and screw the cover and glass pane back in place, as shown in the image below.
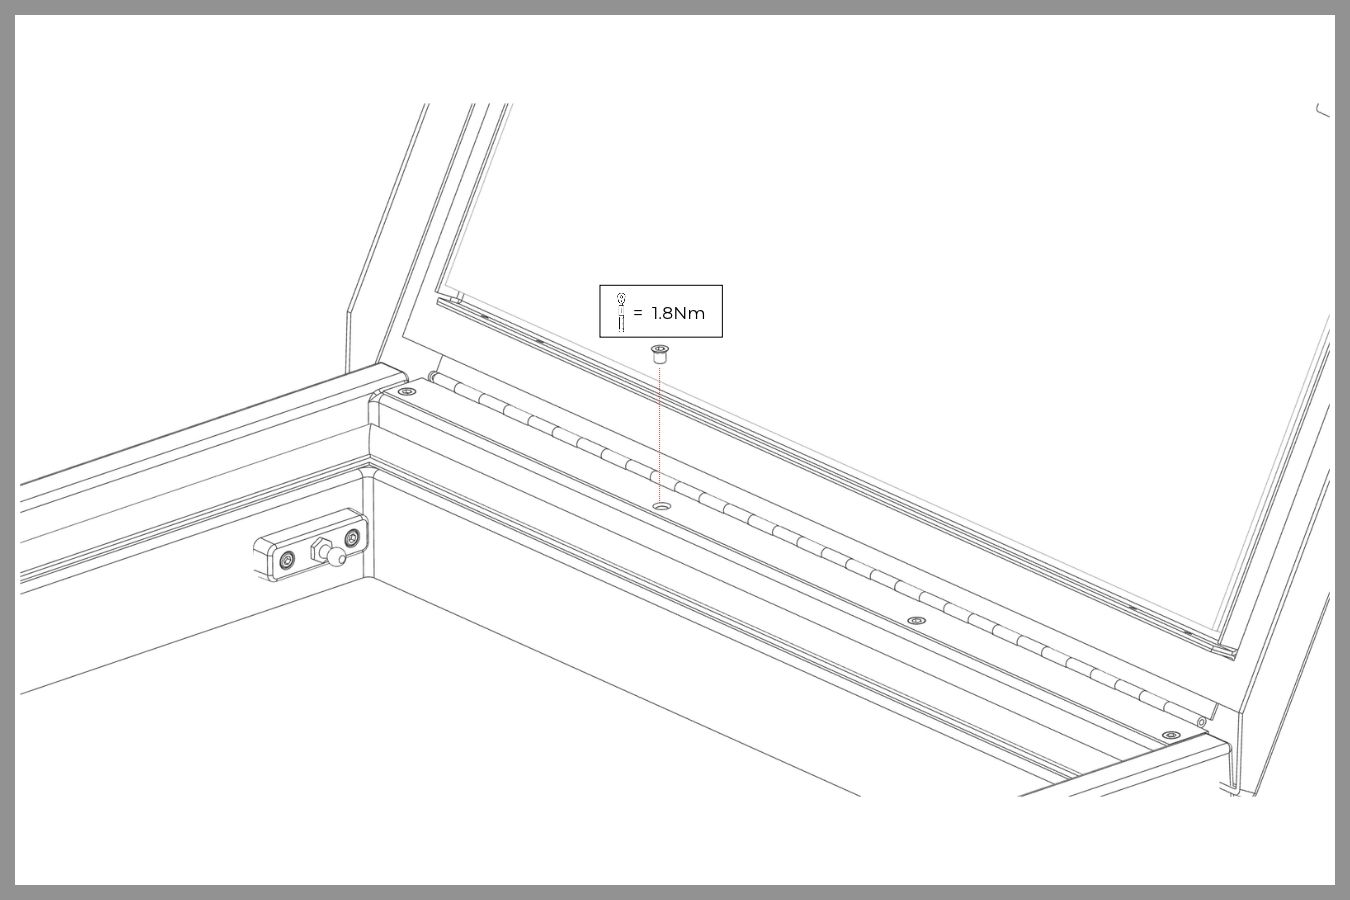
Mount the cover
Panorama hatch (PL)
The panorama hatch combines a window section and a hatch section.
- Window section: remove the glass pane including the hinge, as described for windows.
- Frame and hatch section: spray these as described for hatches, doors and cabin doors.
Applying the rubber seals
- Only apply the rubber seals once the paint has cured completely.
- Watch the instruction video on how to apply the seals: Rubber seal installation instruction.
- Put talcum powder on the rubber seal, this extends the life of the rubber.
Questions?
If you are unsure how to remove or refit your product, get in touch with a specialist, workshop or contact Outbound at www.outbound.eu. Send a photo with your question, so we can help you faster.
Frequently asked questions
Yes. For windows, hatches and doors the self-adhesive rubber seals are supplied loose as standard, so you can spray first. On skylights the seals are already fitted.
Yes, but the paint will then crack on the flexible sealant seam between frame and wall. After spraying, apply a new flexible sealant seam over the existing one. Spraying the frame before installation is easier.
We strongly advise against it. Dark colours absorb heat, which can deform the frame, hatch or door and cause leaks or closing problems. Outbound accepts no liability for this damage.
No. The hinge is bonded to the hatch or door for strength. Leave it in place, only unscrew it on the frame side and tape it off before spraying. Windows are removed including the hinge.
No. Most customers spray the frame up to under the rubber seal. The inside then stays white, just like a white roller blind. You can also spray the complete frame in the colour of your vehicle.