Yes. The installation is designed to be straightforward: the roof window and integrated roller blind are mounted as a single unit from the outside. The interior felt trim adapts automatically to roof thicknesses between 25 and 60 mm. Both professionals and skilled DIYers can install the product easily.
Safety and installation
Before starting installation, check whether this modification affects the vehicle registration. This prevents possible problems with the authorities and/or your insurance company.
Carefully read theprescribed safety instructions and the vehicle manufacturer’s regulations, or consult a specialised company.
Note: Keep the roof window closed during installation, leave the cardboard spacers in place, and ensurethat the roof window and combi rollo remain assembled until the installation is fully completed.
Outbound accepts no liability in the following cases:
- Damage to the product caused by mechanical influences.
- Modifications or alterations to the roof window or the combi rollo.
Warning! Failure to follow these instructions may cause material damage and negatively affect the function of the roof window or the combi rollo.
Note:If you do not have sufficient technical knowledge to install the roof window correctly, we recommend having the installation carried out by a specialist.
Observe the following:
- In case of problems, immediately consult a specialised company.
- Never step on the glass due to the risk of breakage.
- Before departure, check whether the roof windows are properly locked and free from damage.
- Close the roof window in strong wind and precipitation.
Warning! Always keep the roof window closed while driving.
Installation instructions
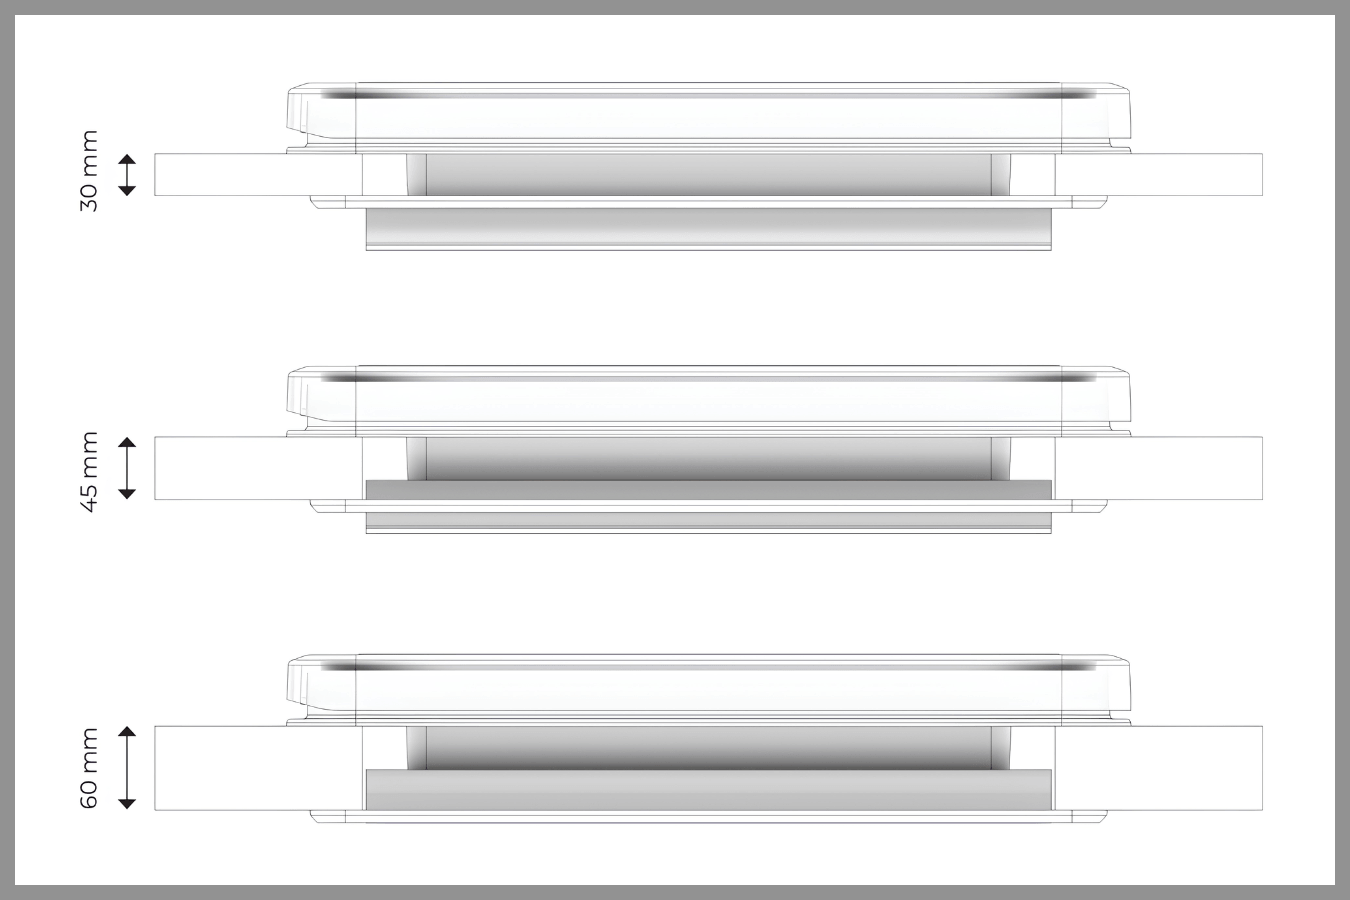
Check the wall thickness of your vehicle before installation. Our roof windows can be installed without modification in a flat roof panel with a thickness of 30 to 60 mm. For installation in van roofs with a profiled surface, an adapter frame is required so that the roof window can be bonded to a flat surface.
- For wall thicknesses below 30 mm, the roof must be filled and reinforced with a frame.
- For wall thicknesses above 60 mm, the roof window remains functional, but the interior finish must be provided by the installer.
When choosing the installation location, observe the following:
- Always install the roof window with the hinge facing the front or side of the vehicle.
- Ensure that adjacent components (reinforcement parts, cables, cabinets) are not damaged when cutting the opening.
- Ensure there is sufficient space for mounting the frame on both the inside and outside.
- Install the roof window only on a flat surface and do not bend the frame. If necessary, an adapter frame can be used to level the roof.
- Torsion and stress in the vehicle and cabin can damage the roof window.
- Check whether the product dimensions correspond to the technical drawings.
- Check the planned position of the roof window on both the inside and outside of the vehicle.
Warning! Do not remove the cardboard spacers. They maintain a uniform space around the product and ensure easy, stress-free installation. Leave the spacers in place until the installation is fully completed and the sealant has cured. Removing them prematurely may cause the frame to deform.
Making the cut-out
- Make the cut-out according to the drawing below with the specified dimensions. The required installation clearance has already been taken into account in the drawing and diagram.
- Make the cut-out with drilled corner holes. This reduces stress concentrations and lowers the risk of the roof panel tearing.
- Ensure that the product is always installed free of stress.
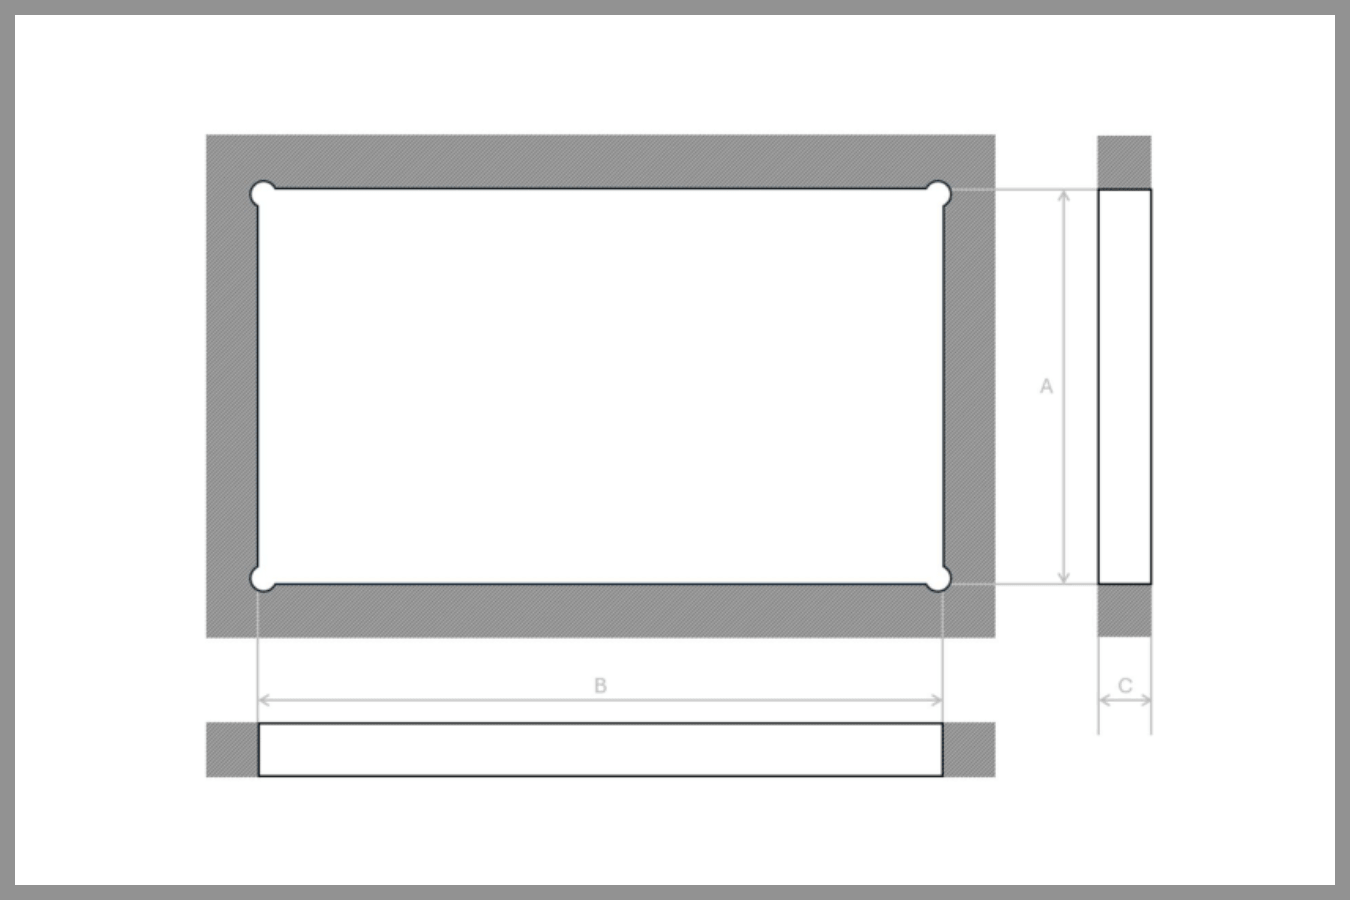
| Size Skylight | A | B | C |
|---|---|---|---|
| 40 x 40 cm | 400 mm | 400 mm | 30 - 60 mm* |
| 70 x 50 cm | 500 mm | 700 mm | 30 - 60 mm* |
| 96 x 65 cm | 655 mm | 960 mm | 30 - 60 mm* |
*The exact value of C depends on the thickness of the roof.
Installing the roof window
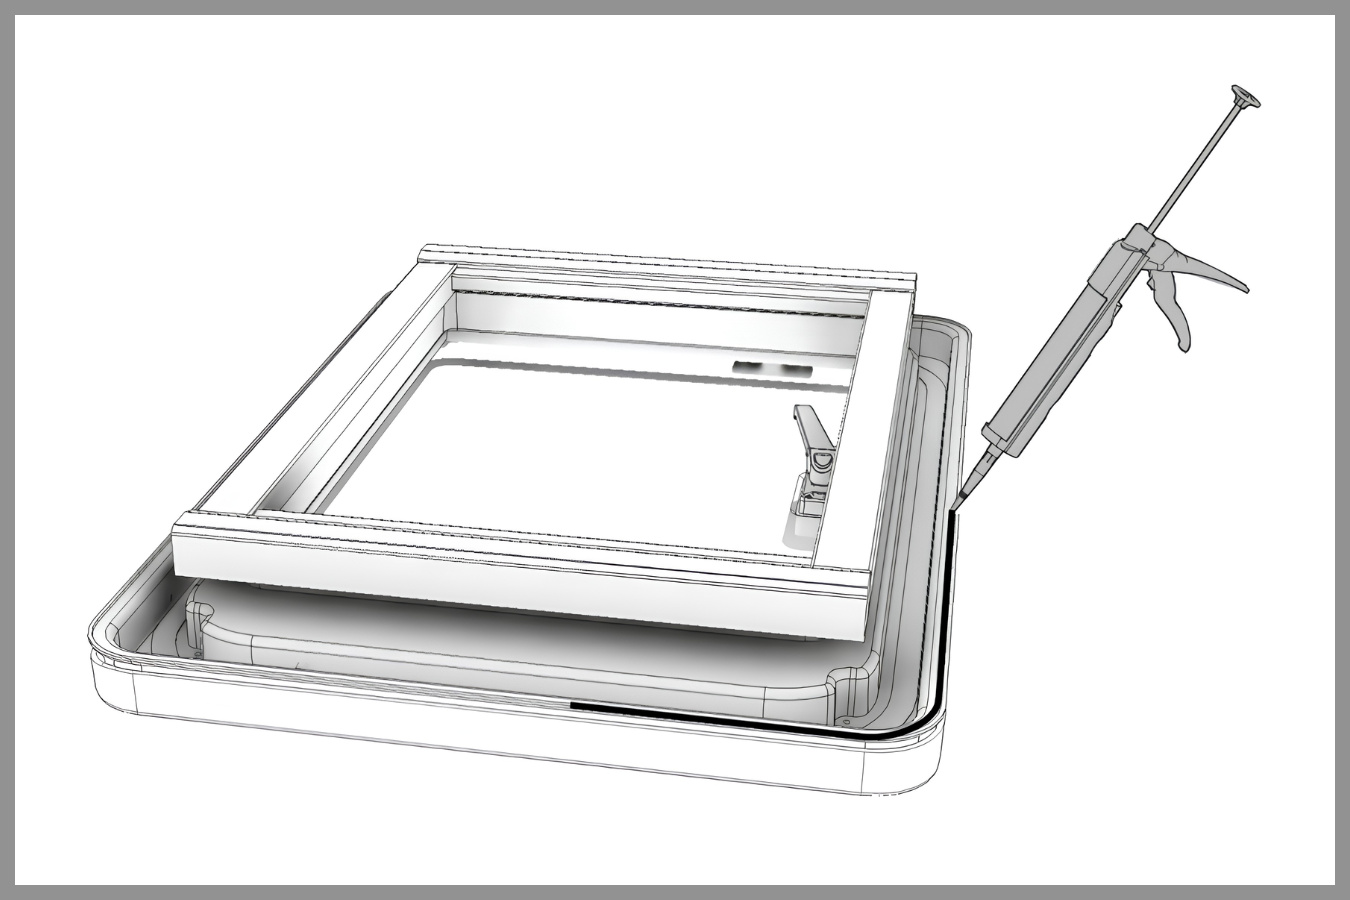
The roof window with combi rollo is installed from the outside of the vehicle and bonded all around the outside with a curing, elastic sealant such as MS polymer sealant or PU sealant. On the inside, the cut-out is finished with a felt trim, which serves as a finishing profile around the combi rollo and adapts to the wall thickness.
Preparing the installation surface and the product:
- Clean and degrease the bonding surface thoroughly.
- Lightly sand the surface with sandpaper and clean again.
- Apply activator according to the sealant supplier’s instructions.
- If required, apply a primer. This depends on the material of the surface; follow the supplier’s instructions.
Installation of the roof window:
- Apply a continuous bead of sealant to the frame.
- Place the roof window with combi rollo into the opening and press it evenly.
- Ensure that the frame is aligned correctly and free of stress.
- Visually check that the sealant is squeezed out all around and that the outer frame is in full contactwith the roof surface.
- Remove excess sealant immediately.
- Allow the sealant to cure for at least 24 hours before opening or loading the roof window.
Note: Do not open the roof window during installation and leave the cardboard spacers in place.
Note: Do not use clamps to fix the frame; if needed, use tape.
Post-curing inspection:
- Check that the wall is flat and even. An uneven wall may adversely affect the operation, closing, and watertightness of the roof window.
- Check the correct positioning, closing, ventilation position, and locking of the roof window.
Interior finishing:
- Apply sealant or double-sided tape to the top of the felt trim.
- Place the felt trim around the combi rollo and press it firmly against the roof.
Using the roof window
Opening and closing:
Press the button on the handle to unlock and open the window. The gas strut(s) hold the window in oneof the preset positions.
Ventilation position:
Place the lug of the handle into the locking plate on the frame and ensure that the button on thehandle clicks into place.
Closing:
Pull the roof window fully towards you with the handle. Close the handle until a click is heard and checkthat the handle is properly locked behind the locking plate.
Important instructions:
- Do not open the roof window in strong wind or precipitation.
- Always check before departure that the roof window is properly closed and locked.
Maintenance of the roof window and combi rollo
Cleaning glass and polycarbonate:
- Clean the tempered glass on the outside with lukewarm water and a mild cleaning agent.
- Clean the transparent polycarbonate on the inside only with lukewarm water and mild soap. Use asoft cloth; avoid paper or hard materials to prevent scratches.
- Do not use solvents, alcohol, ammonia, or abrasive cleaners.
Maintenance of the combi rollo:
- Clean the combi rollo with mild soap and water.
- The upper and lower cassettes can be easily cleaned thanks to the click system. Pull the panels towards you and click them back into position in the same way.
Maintenance of the rubber seals:
- Treat the rubber seals regularly with talcum powder to prevent drying out and to extend their service life.
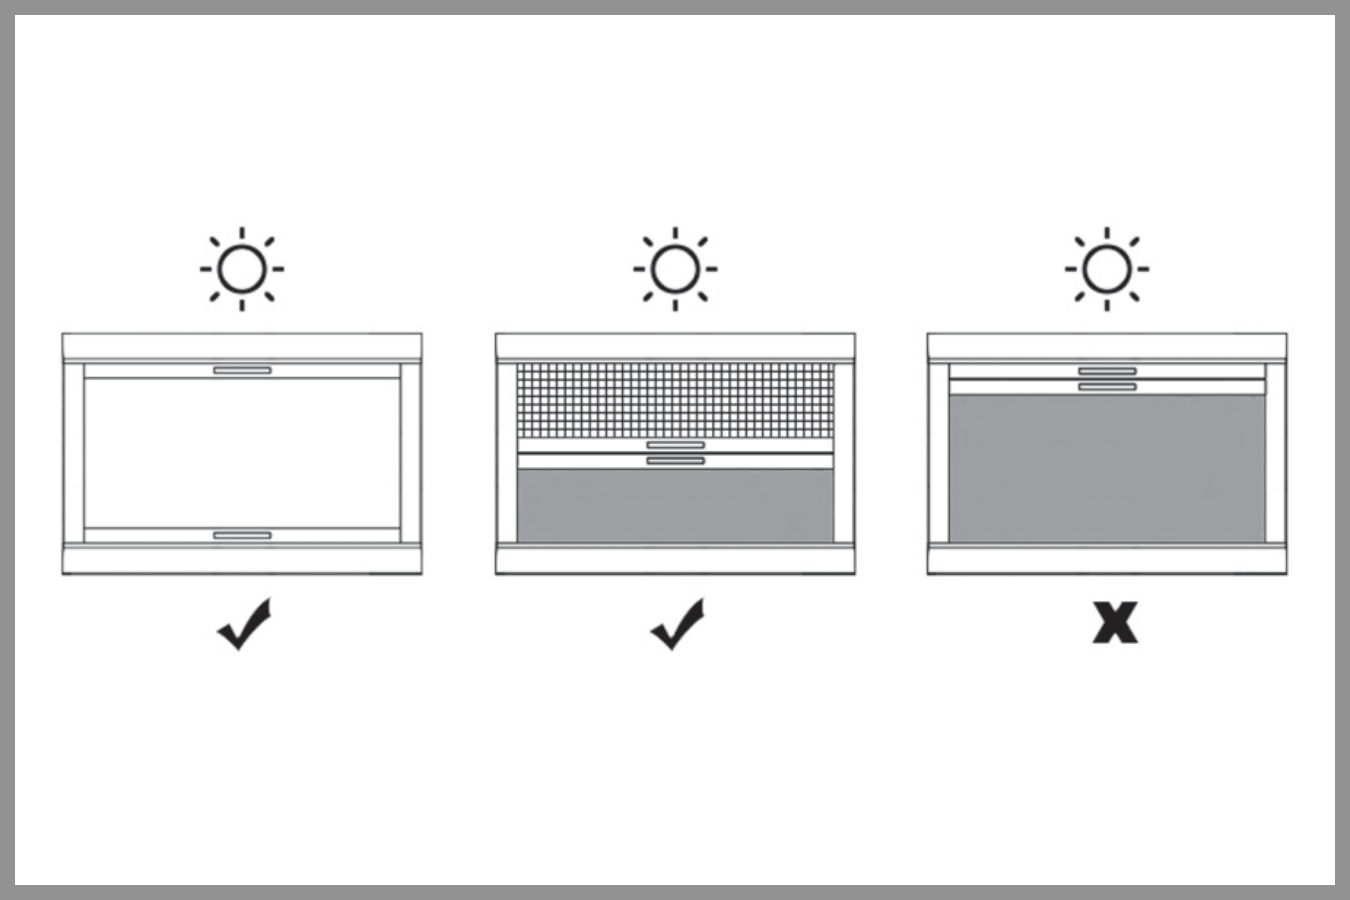
Warning! Heat accumulation between the glass and the combi rollo may cause damage. Do not completelyclose off the space between the roof window and the combi rollo: always allow air circulation byopening the rollo partially or by using the ventilation position. When the vehicle is parked for alonger period, open the rollo completely.
Maintenance of the gas strut:
- Clean the gas strut only with a dry cloth.
- Do not use chemicals or cleaning products; these may damage the gas strut and reduce itsfunctionality.
Maintenance of the latch:
- Lubricate the moving parts lightly 1–2 times per year with light, acid-free oil. Remove excess lubricant immediately.
Warranty
If the roof window / roller blind is defective, please contact your point of sales in your country or send an e-mail to info@outbound.eu.
You can also view our general terms and conditions on our website.
Address: Zandhoek 7a, 5427 PJ, Boekel, The Netherlands
Telephone: +31 (0)492 76 00 34
Email: info@outbound.eu
Frequently asked questions
Yes, but only in the ventilation position. This is a locked setting designed to stay secure while driving, provided the roof window is installed facing the direction of travel. Fully opening the window while driving is not allowed.
Yes. The VAN roof window is available in standard cut-out sizes—40×40, 70×50, and 96×65 cm—and can be used as a direct replacement for models from brands like Dometic Heki, Fiamma, etc. Both the cut-out and the external dimensions are aligned with common setups, so you’re unlikely to run into issues with nearby components like solar panels or interior cabinetry.
The fiberglass-reinforced plastic parts are gel coated. Sanding these lightly allows the frame to be sprayed without any problems. For this purpose, we can supply the self-adhesive sealing rubbers separately. Please inform us at point of order.